Author: admin

  • Insert Photos and Videos (working with media- audio, video, pdf, etc.)

    Insert Photos and Videos (working with media- audio, video, pdf, etc.)

    If after studying this topic you still have questions, please go to CUSTOMER SUPPORT FORUM to ask your question.

    In addition to uploading media files directly to your blog’s media library, you can also upload, manage, and insert images, audio (we suggest embedding audio files) and video (we suggest embedding video files) directly from your post or page editing screen using the Add Media button.

    With the Add Media button, you can easily add an image into a post or page by dragging and dropping your media files into the pop-up box.

    You may add audio and video from your computer to your ONEvoiceFamily.com blog but please read this post before proceeding.

    If you wish to upload audio files directly from your computer, you may but ONEvoiceFamily.com is not a cloud service built for streaming.  Even though we have no limits on many of our accounts, we will not allow one customer to damage or slow the service of the entire community.

    To link to audio and video files hosted elsewhere without storing them in your Media Library insert the appropriate code into the page or post.  We recommend embedding these files. For information on embedding videos from other hosting sites/services (e.g. YouTube, DailyMotion, Vimeo, etc.).

    Lastly, you can also use this button to create download links to documents (PDF, Microsoft Word document, etc.). When inserting a document link into your page or post, make sure to select the Media File option from the Attachment Display Settings drop down menu:

    By clicking Add New on the Media menu you can upload images, audio files, videos and other files to your Media Library without having to start a new post.

    The Add New screen lists your allowed file types, allows you to select files to upload, and shows your remaining upload space.

    upload-new-media

    Simply drag and drop your files into the box that appears, or click Select Files to choose a file from your computer to upload. Please keep in mind that the drag and drop uploader only works in browsers with HTML5 upload support such as the latest versions of Chrome, Firefox, or Safari. Other browsers will still show the Select Files button or the basic browser uploader form.

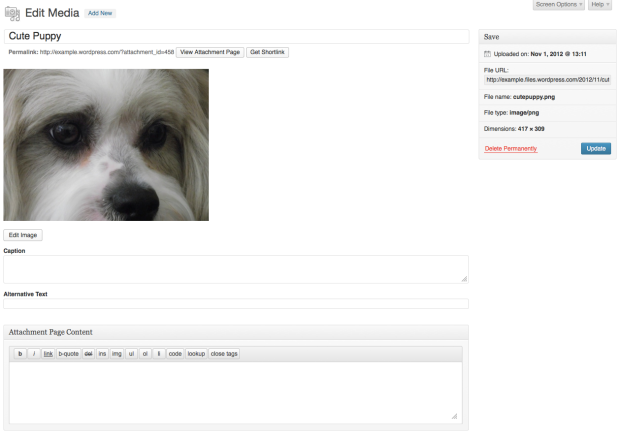
    When a file has finished uploading, you will see a Edit link on the right.

    Clicking on the Edit link will allow you to edit the Title, Alternate Text, Caption, and Attachment Page Content for a file. It will also provide you with the URL of the file. Here’s an example of the options for an image upload:

  • Adding and Editing a Page

    Adding and Editing a Page

    If after studying this topic you still have questions, please go to CUSTOMER SUPPORT FORUM to ask your question.

    The Page Screen is where you create new pages or edit existing pages. The default page screen (Pages → Add New) will look similar to the following image:

    add_new_page

    You will notice in the screenshot that the title of the screen is Add New Page. If you were editing a previous page, the title would be Edit Page, but everything else on the screen is essentially the same.

    The screen is broken down into modules, each with their own purpose. The three most important parts of the page screen are the Title of your page, the Editor (where you type your content), and the Publish module.

    The Publish module is very important because it’s where you save your pages, publish them, and preview changes. The module will change depending on the status of your page. Here is the default Publish module:

    publish_page_new

    After publishing a page, the module will look like this:

    publish_page_update

    Notice how the Save Draft button has been removed and the Publish button has been replaced with Update.

    Other documentation pages will go into more detail on each of the modules and different areas. See Related in the table of contents area on this page.

    Configuring the Screen

    The Screen Options pull down can be found at the top right of the screen. When you click on Screen Options you will see a set of modules that can be set to show or hide. To hide one of the modules from showing on the screen, just check the box next to it.

  • Embedding a YouTube Video

    Embedding a YouTube Video

    If after studying this topic you still have questions, please go to CUSTOMER SUPPORT FORUM to ask your question.

    Embedding a YouTube video with a URL

    To quickly embed a YouTube video, simply copy the video’s URL from your web browser’s address bar while viewing the video:

    Paste it on a line by itself in your post/page editor (make sure that it is not hyperlinked):

    We take care of the rest!


    Troubleshooting

    • Make sure the YouTube link is not hyperlinked. If the URL is shown in your theme’s link color (as the second line in the screenshot below), then it is hyperlinked. Simply select the whole URL and click the “Unlink” icon on your Visual Editor toolbar.

      Once the URL is unlinked, you will see the link text in black.
    • Make sure to place the YouTube URL or shortcode on its own line. This means there should be no character or whitespace before or after the URL/shortcode.

    Alternatively, to change the size and other attributes of the video, you may use the html code provided on YouTube.com.  First, copy the code.  Second, paste into the editor as TEXT (notice the upper right corner where there are two tabs (Visual and Text).

  • Working with Categories

    Working with Categories

    If after studying this topic you still have questions, please go to CUSTOMER SUPPORT FORUM to ask your question.

    Categories provide a helpful way to group related posts together, and to quickly tell readers what a post is about. Categories also make it easier for people to find your content. Categories are similar to, but broader than, tags. For more information on the differences between categories and tags please check out this support doc.

    Depending on the theme and widgets you have activated, categories can be displayed at the top or bottom of posts, on the individual post view, and/or in the sidebar. You can assign multiple categories per post (you must assign at least one), and categories can be organized hierarchically.

    Adding Categories via the Categories Module

    You can assign and/or add new categories to posts before you publish them using the Categories module to the right of the post editor:

    Select the checkbox next to a category name to add it to a post.

    • If you would like to add a new category to your blog and associate it with the post, click + Add New Category.
    • Click the Most Used tab at the top of the module to select from your already created categories that you use the most.
    • Use the Parent Category drop down menu to nest a category within a category.

    Adding Categories via the Dashboard

    You can also add new categories and manage existing ones from Posts -> Categories in your dashboard.

    You will be presented with a list of your existing categories and an option to add new categories.

    Categories Page

    You can add a new category by filling out the fields:

    Add Category

    • Category name – As expected, the name of your category.
    • Category parent – If you want to nest a category within a category, select the parent category. Otherwise leave at None.
    • Description – Describe what the category is for. This description will appear as a tooltip if you use the category widget. (Optional)

    Managing Categories

    The Posts -> Categories page in your dashboard displays all your categories and shows the name, description, and number of posts belonging to each category. If you move your mouse over a category a set of options will appear, allowing you to edit, quick-edit, or delete that category:

    Edit Category

    If you click on Quick Edit the category will change into an edit box and you can rename the category quickly:

    Quick Edit

    If you click on Edit you will taken to a separate page where you can edit the name, parent, and description. This functions exactly the same as adding a category.

    Clicking on Delete will delete that category. When a category is deleted, all posts that were only in that category will be assigned to the default category. If a post was also in other categories it will remain untouched.

    Note: You cannot delete the default category.

    Bulk Actions

    If you have a lot of categories that you want to delete, then you can use the bulk actions feature. Select each category you want to delete using the checkbox to the left of the category name.

    Delete Checkbox

    If you want to select all categories, click the checkbox at the top:

    Check All

    Once you have selected the categories you want to delete select Delete from the Bulk Actions menu, and then click Apply. The categories will be deleted. When a category is deleted, all posts that were only in that category will be assigned to the default category. If a post was also in other categories it will remain untouched.

    Bulk Delete

    Setting the Default Category

    A default category (uncategorized) will be assigned to published posts if you don’t specify one. The default category can be changed under Settings -> Writing in your dashboard.

    Converting Categories to Tags

    If you change your mind about using categories and instead want to convert them to tags, you can do so using the category to tag converter. At the bottom of the manage categories screen is a link to the category to tag converter.

    category link

    Clicking this will take you to a screen where you can select which categories to convert to tags. Make your selection, click on Convert Categories to Tags.

    Note: Your categories will be removed and tags will be assigned to the posts that used to be in those categories. If you want to convert your tags back to categories, please check out converting tags to categories.

    Category to Tag

  • Writing and Editing Posts

    Writing and Editing Posts

    If after studying this topic you still have questions, please go to CUSTOMER SUPPORT FORUM to ask your question.

    Some ONEvoiceFamily.com sites come with preloaded posts.  To customize your posts, create new (Add New) ones.  Start by either deleting or hiding the provided posts (by making them private), then create new (Add New) posts.  There are many times you will desire to edit posts.  To edit your blog’s posts, click the Posts menu in your dashboard.

    You’ll see something like this:

    posts-edit-screen

    Filtering Posts

    You can filter the posts displayed using several methods. The first method is using the links at the top of the screen.

    edit-posts-status

    You may also see Private and Pending Review links.

    The next method is using a search.

    edit-posts-search

    The final filtering method is to use the date and category dropdown boxes and then click on the Filter button.

    edit-posts-date-cat-filters

    Deleting Posts

    There are a couple of ways to remove posts from the Posts screen. If you want to trash multiple posts at once, you can check the boxes to the left of each post, select Move to Trash from the Bulk Actions dropdown, and click Apply.

    bulk-move-to-trash

    If you only want to trash one post, place your cursor over the post, and a few action links will appear under the post’s title. Click the Trash link.

    trash-single-post

    To restore a post that you’ve trashed, view your trash by selecting the Trash link near the top of the page. Hover over the title of the post you want to restore and click Restore. This will move the page back to your Posts menu. You can restore multiple posts at once using the Bulk Actions dropdown.

    To permanently delete a post, view your trash by selecting the Trash link near the top of the post. Hover over the title of the post and click Delete Permanently.

    To permanently delete all your trashed posts, go to your trash and click Empty Trash.

    Quick Edit

    The Quick Edit option will appear below a post title when you hover over the title. Quick Edit lets you modify the post details such as title, slug, date, author, password, privacy, categories, tags, comments, status, and sticky.

    quick-edit

    Bulk Edit

    Using the Bulk Actions drop-down menu at the top of the Edit Posts list, you can bulk edit several posts at a time. To do that, select several posts from the list using the checkboxes on the left. Then select Edit from the Bulk Actions drop-down menu and click the Apply button. You will see options that can be applied to all of the selected posts.

    posts-bulk-edit

    Note: There currently isn’t a way to bulk edit multiple posts to switch the status from Password Protected to Public.

    Excerpt View

    You can show an excerpt of each post in the list by using Excerpt View button above the list.

    edit-posts-list-excerpt-views

    When you make the change, a post row will now show some of the content from the post.

    edit-posts-excerpt-view

    Configuring the Screen

    By using the Screen Options pull down at the top right of the screen, you can show/hide the columns displayed on the Edit Posts Screen. See the Screen Options support doc for more information.


  • Understanding the Dashboard

    Understanding the Dashboard

    If after studying this topic you still have questions, please go to CUSTOMER SUPPORT FORUM to ask your question.