Category: Step by Step Instructions

Members of ONEvoiceFamily.com can see all of “Step by Step Instructions.”

  • Working with Categories

    Working with Categories

    If after studying this topic you still have questions, please go to CUSTOMER SUPPORT FORUM to ask your question.

    Categories provide a helpful way to group related posts together, and to quickly tell readers what a post is about. Categories also make it easier for people to find your content. Categories are similar to, but broader than, tags. For more information on the differences between categories and tags please check out this support doc.

    Depending on the theme and widgets you have activated, categories can be displayed at the top or bottom of posts, on the individual post view, and/or in the sidebar. You can assign multiple categories per post (you must assign at least one), and categories can be organized hierarchically.

    Adding Categories via the Categories Module

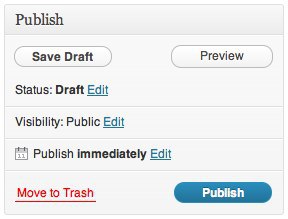
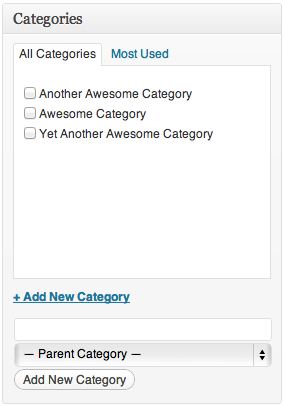
    You can assign and/or add new categories to posts before you publish them using the Categories module to the right of the post editor:

    Select the checkbox next to a category name to add it to a post.

    • If you would like to add a new category to your blog and associate it with the post, click + Add New Category.
    • Click the Most Used tab at the top of the module to select from your already created categories that you use the most.
    • Use the Parent Category drop down menu to nest a category within a category.

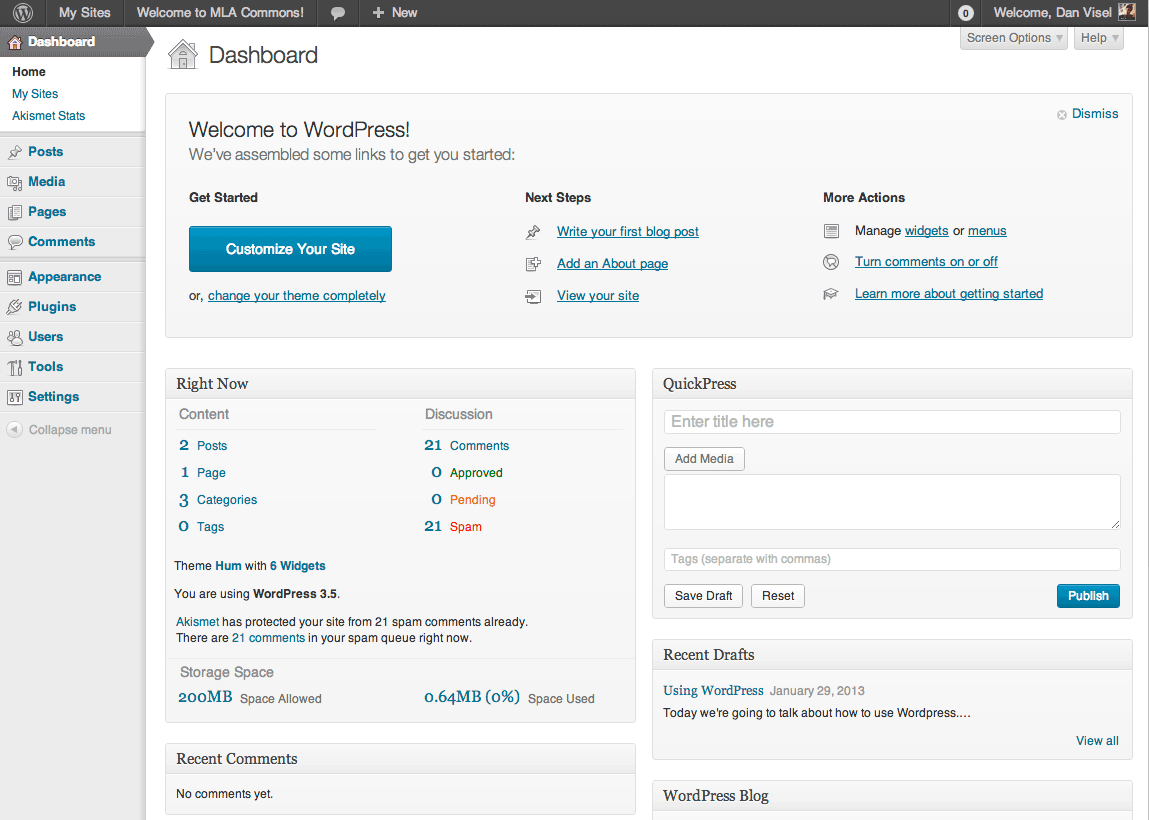
    Adding Categories via the Dashboard

    You can also add new categories and manage existing ones from Posts -> Categories in your dashboard.

    You will be presented with a list of your existing categories and an option to add new categories.

    Categories Page

    You can add a new category by filling out the fields:

    Add Category

    • Category name – As expected, the name of your category.
    • Category parent – If you want to nest a category within a category, select the parent category. Otherwise leave at None.
    • Description – Describe what the category is for. This description will appear as a tooltip if you use the category widget. (Optional)
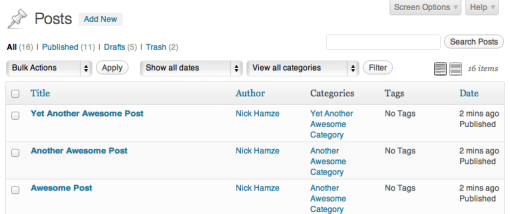
    Managing Categories

    The Posts -> Categories page in your dashboard displays all your categories and shows the name, description, and number of posts belonging to each category. If you move your mouse over a category a set of options will appear, allowing you to edit, quick-edit, or delete that category:

    Edit Category

    If you click on Quick Edit the category will change into an edit box and you can rename the category quickly:

    Quick Edit

    If you click on Edit you will taken to a separate page where you can edit the name, parent, and description. This functions exactly the same as adding a category.

    Clicking on Delete will delete that category. When a category is deleted, all posts that were only in that category will be assigned to the default category. If a post was also in other categories it will remain untouched.

    Note: You cannot delete the default category.

    Bulk Actions

    If you have a lot of categories that you want to delete, then you can use the bulk actions feature. Select each category you want to delete using the checkbox to the left of the category name.

    Delete Checkbox

    If you want to select all categories, click the checkbox at the top:

    Check All

    Once you have selected the categories you want to delete select Delete from the Bulk Actions menu, and then click Apply. The categories will be deleted. When a category is deleted, all posts that were only in that category will be assigned to the default category. If a post was also in other categories it will remain untouched.

    Bulk Delete

    Setting the Default Category

    A default category (uncategorized) will be assigned to published posts if you don’t specify one. The default category can be changed under Settings -> Writing in your dashboard.

    Converting Categories to Tags

    If you change your mind about using categories and instead want to convert them to tags, you can do so using the category to tag converter. At the bottom of the manage categories screen is a link to the category to tag converter.

    category link

    Clicking this will take you to a screen where you can select which categories to convert to tags. Make your selection, click on Convert Categories to Tags.

    Note: Your categories will be removed and tags will be assigned to the posts that used to be in those categories. If you want to convert your tags back to categories, please check out converting tags to categories.

    Category to Tag

  • Writing and Editing Posts

    Writing and Editing Posts

    If after studying this topic you still have questions, please go to CUSTOMER SUPPORT FORUM to ask your question.

    Some ONEvoiceFamily.com sites come with preloaded posts.  To customize your posts, create new (Add New) ones.  Start by either deleting or hiding the provided posts (by making them private), then create new (Add New) posts.  There are many times you will desire to edit posts.  To edit your blog’s posts, click the Posts menu in your dashboard.

    You’ll see something like this:

    posts-edit-screen

    Filtering Posts

    You can filter the posts displayed using several methods. The first method is using the links at the top of the screen.

    edit-posts-status

    You may also see Private and Pending Review links.

    The next method is using a search.

    edit-posts-search

    The final filtering method is to use the date and category dropdown boxes and then click on the Filter button.

    edit-posts-date-cat-filters

    Deleting Posts

    There are a couple of ways to remove posts from the Posts screen. If you want to trash multiple posts at once, you can check the boxes to the left of each post, select Move to Trash from the Bulk Actions dropdown, and click Apply.

    bulk-move-to-trash

    If you only want to trash one post, place your cursor over the post, and a few action links will appear under the post’s title. Click the Trash link.

    trash-single-post

    To restore a post that you’ve trashed, view your trash by selecting the Trash link near the top of the page. Hover over the title of the post you want to restore and click Restore. This will move the page back to your Posts menu. You can restore multiple posts at once using the Bulk Actions dropdown.

    To permanently delete a post, view your trash by selecting the Trash link near the top of the post. Hover over the title of the post and click Delete Permanently.

    To permanently delete all your trashed posts, go to your trash and click Empty Trash.

    Quick Edit

    The Quick Edit option will appear below a post title when you hover over the title. Quick Edit lets you modify the post details such as title, slug, date, author, password, privacy, categories, tags, comments, status, and sticky.

    quick-edit

    Bulk Edit

    Using the Bulk Actions drop-down menu at the top of the Edit Posts list, you can bulk edit several posts at a time. To do that, select several posts from the list using the checkboxes on the left. Then select Edit from the Bulk Actions drop-down menu and click the Apply button. You will see options that can be applied to all of the selected posts.

    posts-bulk-edit

    Note: There currently isn’t a way to bulk edit multiple posts to switch the status from Password Protected to Public.

    Excerpt View

    You can show an excerpt of each post in the list by using Excerpt View button above the list.

    edit-posts-list-excerpt-views

    When you make the change, a post row will now show some of the content from the post.

    edit-posts-excerpt-view

    Configuring the Screen

    By using the Screen Options pull down at the top right of the screen, you can show/hide the columns displayed on the Edit Posts Screen. See the Screen Options support doc for more information.


  • Understanding the Dashboard

    Understanding the Dashboard

    If after studying this topic you still have questions, please go to CUSTOMER SUPPORT FORUM to ask your question.

  • Scheduling a Post

    Scheduling a Post

    If after studying this topic you still have questions, please go to CUSTOMER SUPPORT FORUM to ask your question.


    You can schedule blog posts to automatically publish themselves at any time in the future. If you want to remove an already published post and automatically republish it at a specific time/date in the future, the directions are the same:

    In the Publish module to the right of the post editor, click the blue Edit link next to Publish immediately.

    Set the future date/time when you want the post to publish itself and click OK. To schedule a post in the PM, you will need to use the 24-hour clock. For example, 1:00 PM would read as 13:00 in the Schedule a Post module. The time will be based on your location settings in your Settings -> General page.

    Instead of Publish immediately, it will now say Schedule for: followed by the date and time you specified, and the button has changed from Publish to Schedule.

    Click Schedule. Scheduled posts will be triggered by the first visit to your blog on or after the exact date/time you set. If you see that the scheduled time has come and gone and your post has not published, simply log out of ONEvoiceFamily.com and view your blog’s front page. Your visit should cause the post to appear.

    Note: Sometimes you might want to backdate a post. For example, if you’ve just come back from a long trip, you might want to write a post for each day of your travels and have the post dates match the actual days you were away. To backdate a post, simply edit the date before you click Publish, as described above. In this case, the button will not change to Schedule.

    Un-scheduling a Post

    If you’ve scheduled a post to be published in the future, but changed your mind and want to publish it immediately, head back to the Edit Post page for your scheduled post.

    In the Publish module, click on the “Edit” link next to the date for which you’ve scheduled your post:

    Then, enter today’s date and time as your scheduled post time and click on “Ok.” When finished, click Publish and your post will be published immediately.

    Troubleshooting Scheduled Posts

    If your scheduled post does not appear, check the following:

    • Is your timezone correct in your Settings -> General page?
    • Did you save your post as a draft rather than schedule it? For the post to publish, you must click the Schedule button.
    • Has no one visited your blog yet? Try logging out of ONEvoiceFamily.com and visiting your blog’s front page.