If after studying this topic you still have questions, please go to CUSTOMER SUPPORT FORUM to ask your question.
In addition to uploading media files directly to your blog’s media library, you can also upload, manage, and insert images, audio (we suggest embedding audio files) and video (we suggest embedding video files) directly from your post or page editing screen using the Add Media button.

With the Add Media button, you can easily add an image into a post or page by dragging and dropping your media files into the pop-up box.
You may add audio and video from your computer to your ONEvoiceFamily.com blog but please read this post before proceeding.
If you wish to upload audio files directly from your computer, you may but ONEvoiceFamily.com is not a cloud service built for streaming. Even though we have no limits on many of our accounts, we will not allow one customer to damage or slow the service of the entire community.
To link to audio and video files hosted elsewhere without storing them in your Media Library insert the appropriate code into the page or post. We recommend embedding these files. For information on embedding videos from other hosting sites/services (e.g. YouTube, DailyMotion, Vimeo, etc.).
Lastly, you can also use this button to create download links to documents (PDF, Microsoft Word document, etc.). When inserting a document link into your page or post, make sure to select the Media File option from the Attachment Display Settings drop down menu:

By clicking Add New on the Media menu you can upload images, audio files, videos and other files to your Media Library without having to start a new post.

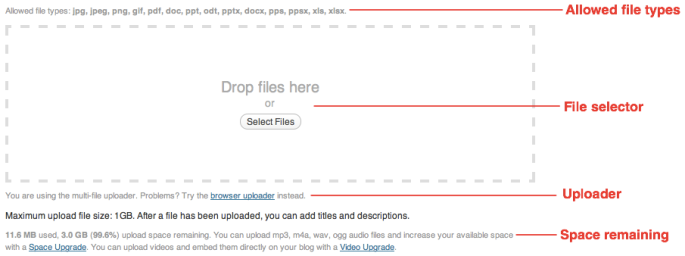
The Add New screen lists your allowed file types, allows you to select files to upload, and shows your remaining upload space.

Simply drag and drop your files into the box that appears, or click Select Files to choose a file from your computer to upload. Please keep in mind that the drag and drop uploader only works in browsers with HTML5 upload support such as the latest versions of Chrome, Firefox, or Safari. Other browsers will still show the Select Files button or the basic browser uploader form.
When a file has finished uploading, you will see a Edit link on the right.

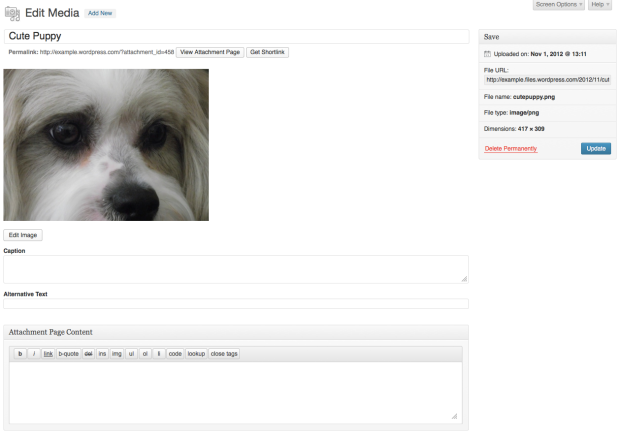
Clicking on the Edit link will allow you to edit the Title, Alternate Text, Caption, and Attachment Page Content for a file. It will also provide you with the URL of the file. Here’s an example of the options for an image upload:
